Thursday, December 29, 2011

Adding to Special Collections


Traditions are what make holidays personal and special.
I have been collecting "Santa on Animals" for many years.
When I could never find my favorite animal,
a sheep with Santa riding on it's back,
my daughter Kate made one for me.


Thus began one of my dearest holiday traditions.
For the past several years,
Kate has gifted me a new addition to my collection.
(You can read about the others here and here.)


This year I got "Santa on a Cow!"


Isn't she a charmer?


She's right at home with the rest of the crowd.
As if this wasn't enough to thrill her Mom,
Kate also gifted me with a clay "Pinky"
to add to my flock.


If you're a regular visitor here,
you know about "Pinky."


She's right at home with the rest of the flock!

Thank you, darling girl Kate!

This week I'm partying at
Open House Party Thursday at No Minimalist Here
Feathered Nest Friday at French Country Cottage
Show and Tell Friday at My Romantic Home

Tuesday, December 27, 2011

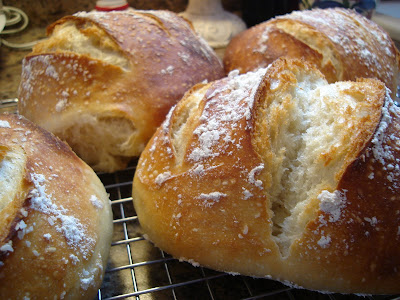
Revisiting Artisan Bread 101

Kim at Savvy Southern Style today offered an invitation
 to re post something we've done this year
for this week's linky party.
I looked back at my posts for this year and
this one was the most visited,
so I'm bringing it back for the occasion.
I'm still making it and
still loving it!


 Remember when bread machines were the
"must-have" kitchen appliances?
For many years I had one that gave
me excellent results and
I never bought bread.
I literally used it to death.
However, my bread efforts were never
as successful with my second bread machine.


So, I gave up bread baking and contented myself
with this "not-too-bad" store bought one.
Then last year at a knitting retreat
I tasted a friend's "baked that morning"
artisan bread.
I came home determined to
start baking bread again.
With some Internet investigations
I have found an extremely easy
method to make artisan bread.


(from Google images)
I am simplifying the recipe here, but you can
go to source with this book.
If you do try this method, please
go to this website for the complete
and detailed instructions.

Four simple ingredients are ALL you need.

Place 3 cups lukewarm water in a large bowl.

Add 1 1/2 T. granulated yeast (2 packets)
1 T. kosher or other coarse salt
6 1/2 c. flour, unsifted, unbleached, all-purpose


Aren't these measuring spoons great?

They were a Christmas present!
Thank you Rick and Terry!


Mix with a wooden spoon.

Kneading is unnecessary.
Mix just until there are no moist patches.

Cover (not airtight) and allow to rise at

room temperature for
approximately two hours.
At this point you are ready to bake,
or refrigerate the dough (covered) until you are.
I usually make the dough and then
bake on another day.
The refrigerated dough is
easier to handle than when
it is at room temperature.
The dough can be stored for up

to two weeks.
Refrigerating the dough for

at least 24 hours improves the flavor.
On baking day,

sprinkle the surface of your dough with flour
and divide it into four equal portions.
I "cut" it into portions with a knife,
then scoop out one section at a time.
Flour your hands, take one
portion and shape it into a smooth ball.
Do not spend a lot of time or effort here,
this should take less than a minute.


Place the loaf on a lightly oiled

and floured baking sheet.
I always bake all four loaves
at the same time
and freeze three loaves
for later.
Let the dough rest for 20 minutes.

After 20 minutes, began preheating
your oven to 450 degrees F.
When you turn on the oven,
place an empty broiler tray
on a lower shelf in the oven.
After 20 minutes (dough has now
rested a total of 40 minutes)
you are ready to bake.
(Don't be concerned if your oven
hasn't yet reached the
desired temperature.)
Dust with flour and slash the
tops of your loaves.
I also sprinkle the tops of all
four loaves with a bit more
kosher salt.
Place loaves in oven and
pour 1 cup of hot tap water into
the broiler pan you've been
preheating. This creates the
steam which will give your
bread a nice crunchy crust.
Bake for about 30 minutes.
Crust should be nicely browned
and firm to the touch.

It doesn't get much simpler,

or better,
than that!


I am linking this post to
Wow us Wednesday at Savvy Southern Style

Friday, December 23, 2011

The Kitchen Tree


How is it possible that this is Christmas weekend???
This has been an incredibly busy season for me.
Beginning in early November with our Holiday Show,
on to Thanksgiving and having Kate home for the weekend.
Then, decorating and shopping for the holidays.
After that, my brother Rick and I made a quick trip together
to visit our parents.
All the while, I've also been working diligently to get
my Etsy orders shipped in a timely manner and
producing new items to restock the "shop."
Whew!


As a result, I haven't done a single holiday posting.
I didn't want you to think I was a total Scrooge.
I am enjoying lots of pretty holiday decorations.
One of my favorites is a small kitchen tree
for which I've been collecting ornaments for many years.


So, let me pour you a cup of tea
and let's enjoy the tree for a bit!


Would you like a gingerbread cookie?


Or perhaps a s'more?


I think I'll have a lovely sugar dipped cherry
and some whipped cream.
This is an ornament a good friend, Debby made years ago.
It's one of my favorites.


Perhaps we could share
some favorite recipes?


Real espresso cups make ideal ornaments for a kitchen tree.


Sitting atop my little kitchen tree is the Chef.
He helps me with holiday meals.


Thanks so much for letting me share
the kitchen tree with you.
I've already been thinking of resolutions for the new year.
One of which is to be a better neighbor in Blog Land,
visiting you and inviting you into Buttermilk Cottage!

Happiest of holidays to each and every one of you!

Saturday, December 17, 2011

From My Book Shelf--ONE DAY


I have just finished ONE DAY by David Nicholls.
It seemed to take me for...ev...er...to get through this book.
Normally, this is the type book I would love.
It's a "relationship" story of
Emma and Dexter,
who have a one night stand on the
night of their graduation from university.
From there the book proceeds through the next
twenty years of their lives as they go their separate ways,
always to reconnect again, at least once a year.
I found these two characters extremely irritating.
Emma has a mundane start with
lowly, boring jobs, boyfriends, etc.
However, her aspirations to write are eventually fulfilled.
Dexter on the other hand, starts on a high plane.
He's the one who always falls into the right spot
and success.
However, as Emma's life improves, Dexter's
spirals down due to drugs and alcohol.
Despite all this, they have a sincere attraction,
and always maintain their friendship/relationship.
The twenty year span of the novel was a l...o...n...g time
for these two characters to maintain this reader's interest.
Neither is very likable, both are whiny.
I'm going to be blasphemous and recommend you
see the movie, rather than read the book.


I actually saw the movie a few months ago,
and did not realize the book was
same story until I got started with it. (Duh...)
I liked the movie and let's face it,
you can't go wrong with much
in which Anne Hathaway stars.

Thursday, December 15, 2011

Cherry Filled White Chocolate Blondies


It's holiday baking time and this is my all-time favorite cookie.
So, if nothing else, it will get baked for the holidays!


Cherry-Filled White Chocolate Blondies
1/2 c. butter
1 (12-oz) pkg. white chocolate morsels, divided
2 large eggs
1/2 c. sugar
1/2 t. almond extract
1 c. all-purpose flour
1/2 t. salt
1/2 c. cherry preserves
1/2 c. sweetened flaked coconut
1/2 c. sliced almonds


Melt butter in a saucepan over heat, stirring just until melted.
Remove pan from heat,
and add 1 cup white chocolate morsels.
DO NOT STIR.


Beat eggs at high speed with an electric mixer
two minutes or until foamy.
Gradually add sugar, beating until blended.
Stir in white chocolate mixture and almond extract,
stirring until blended.
Add flour and salt, stirring just until blended.


Spread half of the batter into a lightly greased
and floured 8-inch square pan.
Bake at 325 degrees for 20 minutes
or until light golden brown.


Melt 1/2 c. cherry preserves in a small saucepan
over low heat, stirring often.


Spread evenly over partially baked
blondies in pan.


Stir together coconut, remaining
1 c. white chocolate morsels,
and remaining half of batter.


Spread over melted cherry preserves,
spreading to edges of pan.
(Can you tell my pan is "well-used"?)


Sprinkle batter with 1/2 c. sliced almonds.
Bake at 325 degrees for 25 minutes, or until lightly browned.
Cool completely in pan on a wire rack.
Cut into 16 bars.


Heaven on a plate.

You'll find me partying at
Foodie Friday at Designs by Gollum
Show and Tell Friday at My Romantic Home
Feathered Nest Friday at French Country Cottage
Tasty Tuesdays at 33 Shades of Green

Wednesday, December 7, 2011

New in My Etsy Shop

It seems as though
I've been keeping my sewing machine 
running non stop for the past several days!


I've just listed this pretty new
knitting bag at


It has a rich paisley lining.


I've also made needle cases to match!


Don't forget Etsy when doing your
Christmas shopping.
The possibililties are endless!
Related Posts Plugin for WordPress, Blogger...